Classic Reference
Script attributes are a powerful feature that exposes values from your script file to be displayed in the OasisW editor. This means you can write code once and then adjust values on different instances of entities to give them different properties. This is perfect for exposing attributes so that artists, designers, or other non-programmer team members can adjust and modify values without writing code.
Script Attribute Declaration
Script attributes are declared at the top of the script file using the following format:
var MyScript = pc.createScript('myScript');
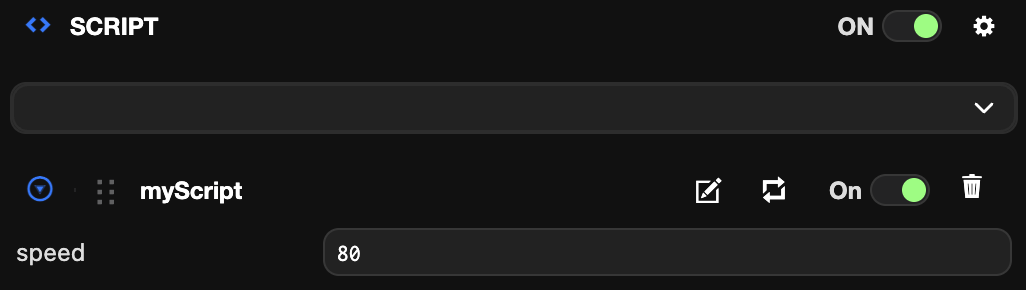
MyScript.attributes.add('speed', {
type: 'number',
default: 80
});
In this example, we are declaring an attribute called speed of type number with a default value of 80:
If you need an array of attributes, set array: true like this:
var MyScript = pc.createScript('myScript');

MyScript.attributes.add('names', {
    type: 'string',
    array: true
});
Getting Attributes in the Editor
After declaring attributes, the editor needs to parse the code to expose the script attributes. If attributes have changed, you need to click the parse button to manually refresh the attributes.

Accessing Attributes in Code
When you declare attributes in a script, they become available as member variables of the script instance. For example, the speed attribute declared above can be used as this.speed.
MyScript.prototype.update = function (dt) {
    this.entity.translate(this.speed * dt, 0, 0);
}
Attribute Updates
When you modify attributes in the editor, the changes are sent to all copies of the application running in the editor. This means you can edit attributes in real-time without reloading the application. If you need to apply special behavior when attributes change, use the attr and attr:[name] events to react to changes.
MyScript.prototype.initialize = function () {
    // Fires only for the `speed` attribute
    this.on('attr:speed', function (value, prev) {
        // New value of speed
    });

    // Fires for all attribute changes
    this.on('attr', function(name, value, prev) {
        // New attribute value
    });
}
Attribute Types
When declaring attributes, you also declare the type of the attribute. This allows the editor to display the appropriate controls for editing the attribute. Most types are self-explanatory, such as 'boolean', 'number', or 'string'. However, some require additional explanation in the examples below. For complete details, see the full attribute reference.
Entity Attributes
MyScript.attributes.add('target', { type: 'entity' })
Using the Entity type allows you to reference other entities in the hierarchy. This is a good way to link two entities together.
Asset Attributes
MyScript.attributes.add('textures', { type: 'asset', assetType: 'texture', array: true });
Asset attributes allow you to reference project assets from your script. Asset attributes also support the assetType property to restrict the attribute to specific types of assets (e.g., 'texture', 'material', 'model').
The runtime type of Asset attributes is pc.Asset. At runtime, you can reference the resource of an Asset attribute like this:
MyScript.attributes.add('texture', {type: 'asset', assetType: 'texture'});

MyScript.prototype.initialize = function () {
    console.log('This is the texture asset', this.texture);
    console.log('This is the texture resource', this.texture.resource);
};
Color Attributes
MyScript.attributes.add('color', { type: 'rgba' });
Color attributes display a color picker when exposed in the editor. There are two options, rgb and rgba, depending on whether you want to expose the alpha channel as well.
Curve Attributes
MyScript.attributes.add('wave', { type: 'curve' }); // One curve
MyScript.attributes.add('wave', { type: 'curve', curves: [ 'x', 'y', 'z' ] }); // Three curves: x, y, z
MyScript.attributes.add('wave', { type: 'curve', color: 'r' }); // One curve for red channel
MyScript.attributes.add('wave', { type: 'curve', color: 'rgba' }); // Four curves for full color including alpha
Curve attributes are used to represent values that change over time. All curves are defined over the 0.0 - 1.0 period. For example, if you want a 3D position from a curve, you can use the curves property to define three curves for x, y, z. There is also a special curve editor for modifying colors using the color property.
Enumeration Attributes
Enumeration attributes allow you to select one of a list of available options:
MyScript.attributes.add('value', {
    type: 'number',
    enum: [
        { 'valueOne': 1 },
        { 'valueTwo': 2 },
        { 'valueThree': 3 }
    ]
});
Use the enum property to declare the list of possible values for the enumeration. The property is an array of objects, where each object is an option with key being the title of the option and value being the value of the attribute. This property can be used with various attribute types like number, string, etc.
JSON Attributes
JSON attributes allow you to create nested attributes of other attribute types. For every JSON attribute, you must specify a schema that describes the attribute. The schema contains other regular script attribute definitions like those above. For example:
MyScript.attributes.add('gameConfig', {
    type: 'json',
    schema: [{
        name: 'numEnemies',
        type: 'number',
        default: 10
    }, {
        name: 'enemyModels',
        type: 'asset',
        assetType: 'model',
        array: true
    }, {
        name: 'godMode',
        type: 'boolean',
        default: false
    }]
});
You can also declare arrays of JSON attributes to create arrays of editable objects. Just add array: true when defining the JSON attribute, like with other attribute types.
Here's an example of accessing the above attribute in a script:
MyScript.prototype.update = function (dt) {
    if (this.gameConfig.godMode) {
        for (var i = 0; i < this.gameConfig.numEnemies; i++) {
            // ...
        }
    }
};
Currently, defining JSON attributes as children of other JSON attributes is not supported. JSON attributes can only be defined to 1 level deep.